
一、安装screen:
yum install screen
screen部分参数说明
-r<作业名称> 恢复离线的screen作业。
-R 先试图恢复离线的作业。若找不到离线的作业,即建立新的screen作业。
-ls或-list 显示目前所有的screen作业
二 、按lnmp.org步骤安装lnmp
screen -S lnmp
wget -c http://soft.vpser.net/lnmp/lnmp1.4.tar.gz && tar zxf lnmp1.4.tar.gz && cd lnmp1.4 && ./install.sh lnmp
按提示分别输入信息:MySQL选默认版本5.5.56、设置MySQL root密码、启用InnoDB引擎、PHP选默认版本5.5.38、不安Memory Allocator,按任意键开始安装(Ctrl+C取消)……,安装大概30分钟。
+- – – – – – – – – – – – – – – – – – – – – – – – – – – – – – – – – – +
| LNMP V1.4 for CentOS Linux Server, Written by Licess
+- – – – – – – – – – – – – – – – – – – – – – – – – – – – – – – – – – +
| A tool to auto-compile & install LNMP/LNMPA/LAMP on Linux
+- – – – – – – – – – – – – – – – – – – – – – – – – – – – – – – – – – +
| For more information please visit https://lnmp.org
+- – – – – – – – – – – – – – – – – – – – – – – – – – – – – – – – – – +
You have 5 options for your DataBase install.
1: Install MySQL 5.1.73
2: Install MySQL 5.5.56 (Default)
3: Install MySQL 5.6.36
4: Install MySQL 5.7.18
5: Install MariaDB 5.5.56
6: Install MariaDB 10.0.30
7: Install MariaDB 10.1.23
0: DO NOT Install MySQL/MariaDB
Enter your choice (1, 2, 3, 4, 5, 6, 7 or 0): 2
You will install MySQL 5.5.56
===========================
Please setup root password of MySQL.(Default password: root)
Please enter: MySQL-root-password
MySQL root password: MySQL-root-password
===========================
Do you want to enable or disable the InnoDB Storage Engine?
Default enable,Enter your choice [Y/n]: y
You will enable the InnoDB Storage Engine
===========================
You have 6 options for your PHP install.
1: Install PHP 5.2.17
2: Install PHP 5.3.29
3: Install PHP 5.4.45
4: Install PHP 5.5.38 (Default)
5: Install PHP 5.6.31
6: Install PHP 7.0.21
7: Install PHP 7.1.7
Enter your choice (1, 2, 3, 4, 5, 6 or 7): 4
You will install PHP 5.5.38
===========================
You have 3 options for your Memory Allocator install.
1: Don’t install Memory Allocator. (Default)
2: Install Jemalloc
3: Install TCMalloc
Enter your choice (1, 2 or 3): 1
You will not install Memory Allocator.Press any key to install…or Press Ctrl+C to cancel
……按任意键开始安装,等待约30分钟,过程省略……
……
…
Install lnmp V1.4 completed! enjoy it.
安装完成后,默认以下网址可进入phpMyAdmin、PHP详细信息、PHP探针
- phpMyAdmin: http://IP/phpmyadmin/
- phpinfo: http://IP/phpinfo.php
- Prober: http://IP/p.php
三、设置域名解释
域名解释生效方可继续一下步,否则Let’s Encrypt证书生成会失败。浏览器输入主机IP地址,如果能显示“恭喜您,LNMP一键安装包安装成功!……”的页面,即代表域名解释生效并且lnmp安装成功
四、添加虚拟主机,运行:lnmp vhost add,根据提示:
1.添加网站域名,例如knowwei.xxx
2.如果有,继续添加网站域名,例如www.knowwei.xxx,无即直接回车
2.设置网站的目录,如果需要自定义目录,必须输入完整路径,例如/home/wwwroot/www.knowwei,否则网站目录将设置在/root/下
3.启用rewrite伪静态,输入y。如果不启用(输入n),wordpress的固定链接设置将不可用
4.rewrite规则为:wordpress
5.启用日志输入y ,不启用输入n
6.输入日志文件名
7.数据库名称和数据库用户名设置是否相同,输入y
8.验证MySQL root password,输入时不会显示字符
9.输入数据库名称、数据库用户名
10.输入数据库用户密码
11.是否加入SSL证书(https),输入y
12.自已无SSL证书,用Let’s Encrypt提供的免费证书,输入2
13.输入邮箱地址
[root@host ~]# lnmp vhost add
+- – – – – – – – – – – – – – – – – – – – – – – – – – – – – – – – – – +
| Manager for LNMP, Written by Licess
+- – – – – – – – – – – – – – – – – – – – – – – – – – – – – – – – – – +
| https://lnmp.org
+- – – – – – – – – – – – – – – – – – – – – – – – – – – – – – – – – – +
Please enter domain(example: www.lnmp.org): knowwei.xxx
Your domain: knowwei.xxx
Enter more domain name(example: lnmp.org *.lnmp.org): www.knowwei.xxx
domain list: www.knowwei.win
Please enter the directory for the domain: knowwei.xxx
Default directory: /home/wwwroot/knowwei.win: /home/wwwroot/www.knowwei
Virtual Host Directory: /home/wwwroot/www.knowwei
Allow Rewrite rule? (y/n) y
Please enter the rewrite of programme,
wordpress,discuz,typecho,sablog,typecho rewrite was exist.
(Default rewrite: other): wordpress
You choose rewrite: wordpress
Allow access log? (y/n) y
Enter access log filename(Default:knowwei.xxx.log): www.knowwei
You access log filename: www.knowwei.log
Create database and MySQL user with same name (y/n) y
Enter current root password of Database (Password will not shown):
OK, MySQL root password correct.
Enter database name: www.knowwei
Your will create a database and MySQL user with same name: www.knowwei
Please enter password for mysql user www.knowwei: password
Your password: password
Add SSL Certificate (y/n) y
1: Use your own SSL Certificate and Key
2: Use Let’s Encrypt to create SSL Certificate and Key
Enter 1 or 2: 2
Please enter your email address: knowwei@xxx.com
It will be processed automatically.
Press any key to start create virtul host…
……按任意键开始安装,等待约5分钟,过程省略……
……
…
nginx: configuration file /usr/local/nginx/conf/nginx.conf test is successful
Reload Nginx……
================================================
Virtualhost infomation:
Your domain: knowwei.xxx
Home Directory: /home/wwwroot/www.knowwei
Rewrite: wordpress
Enable log: yes
Database username: www.knowwei
Database userpassword: password
Database Name: www.knowwei
Create ftp account: no
Enable SSL: yes
=>Let’s Encrypt
================================================
[root@host ~]#
五、安装Wordpress
到https://cn.wordpress.org/txt-download/查看最新版本的Wordpress tar.gz文件路径,逐条执行下面命令:
1.切换到网站目录
2.下载最新版本Wordpress压缩包
3.解压文件
4.将解压后文件移至网站目录
5.删除压缩包和解压后留下的目录
6.修改目录的拥有者和组为www
cd /home/wwwroot/www.knowwei
wget https://cn.wordpress.org/latest-zh_CN.zip
unzip latest-zh_CN.zip
mv wordpress/* .
rm -rf wordpress latest-zh_CN.zip
chattr -i /home/wwwroot/www.knowwei/.user.ini
chown -R www:www /home/wwwroot/www.knowwei
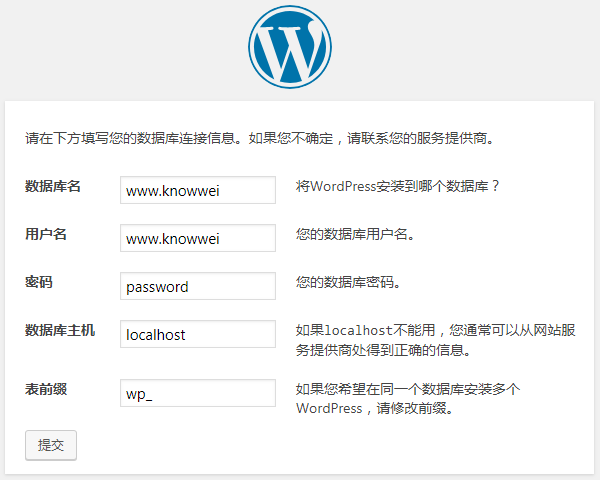
浏览器输入网址http://knowwei.xxx,根据提示填入相对应的信息,Wordpress安装完毕。
六、注意的问题
1.强制http 301跳转到https,修改ngnix配置文件“/usr/local/nginx/conf/vhost/www.knowwei.conf”即可实现,将监听80端口部分修改为
server
{
listen 80;
server_name knowwei.xxx www.knowwei.xxx;
return 301 https://www.knowwei.xxx$request_uri;
}
以下此部分不变
server
{
listen 443 ssl http2;
……
}
2.Wordpress只能显示默认的安装主题,原因为PHP禁用了“scandir”函数,打开“/usr/local/php/etc/php.ini”文件,搜索“scandir,”,删除后保存即可。
……
; This directive allows you to disable certain functions for security reasons.
; It receives a comma-delimited list of function names.
; http://php.net/disable-functions
disable_functions = passthru,exec,system,chroot,scandir,chgrp,chown,shell_exec,proc_open,proc_get_status,popen,ini_alter,ini_restore,dl,openlog,syslog,readlink,symlink,popepassthru,stream_socket_server
……
3.基于安全考虑,建议修改phpmyadmin目录名,位置“/home/wwwroot/default/”。例如将目录名称修改为“php-admin-comeonbaby666”,修改完毕后phpmyadmin的网址相应变更为:http://ip/php-admin-comeonbaby666